2.28.2011

Simplify, simplify


I've started working on a new collage series.  Its a much simpler design - I call it the "3 x 3" series - three color blocks, three pieces of original ephemera, all tied together to tell a story.

I wanted to return to the idea of squares...the origin of my company's name, four corners design, stemmed from my first designs that used a square as its primary graphic element.  If some of you have been following my work for the last ten years, you may remember that my original website used coordinated color squares for the layout.  For some reason, that design element speaks to me...so I wanted to return to squares (and rectangles!)

I also desired to simplify the collage elements...instead of layering elements over one another, I wanted the unique and individual ephemera to stand out.  I have quite a collection of original vintage elements that deserve to shine on their own.  Having found my new love with the gloss medium technique described in my previous post, it seemed the ideal match with this new simplicity.  And continuing my recycled/reuse ethic, I am using scrap pieces of wood for the foundation of each piece.

At the beginning of this post is "worker bee" - its size is 5" x 6" and has a portion of a weekly time sheet from the 1940's.

Here's two more examples from my new series...

"let me have wings" is 8" square and has a book spine from a 1941 novel combined with a bird card from the Arm & Hammer bird series.


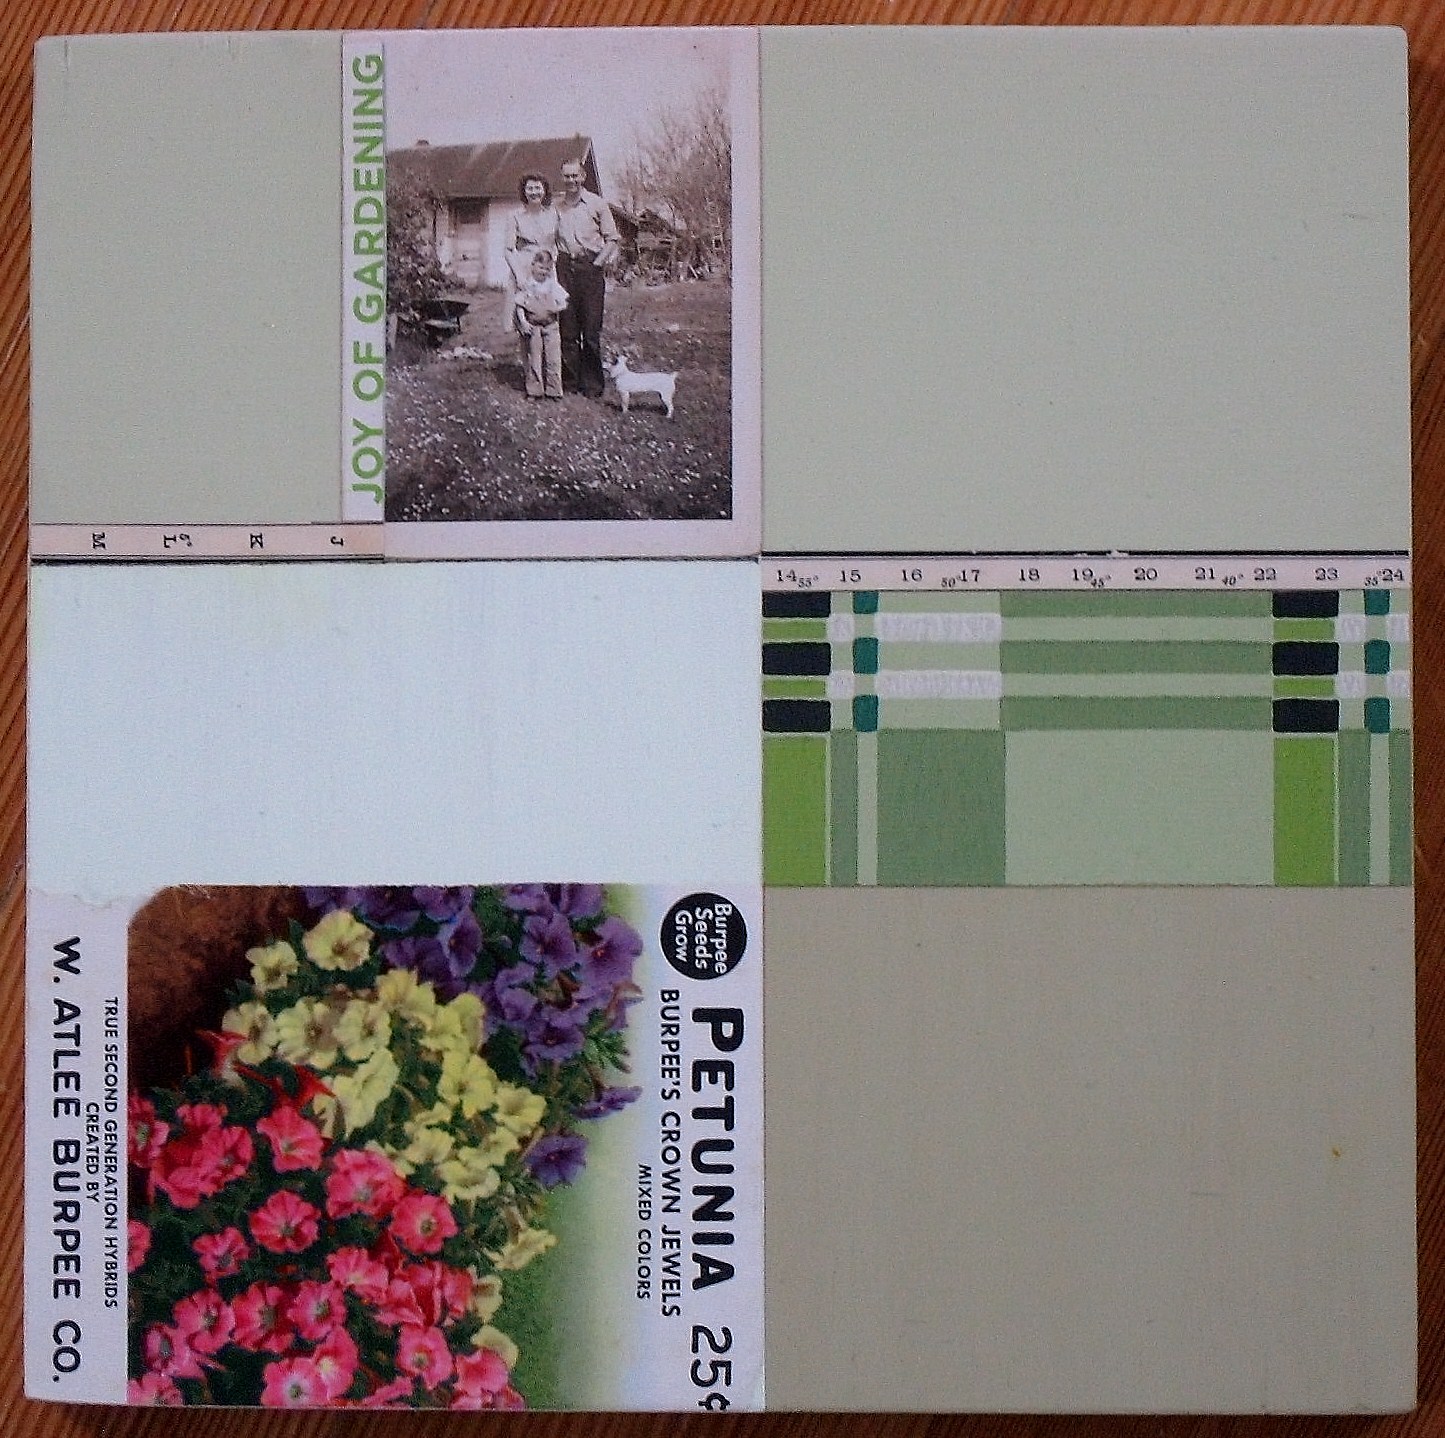
"the joy of gardening" is 8" square and features a vintage seed packet with an original old photo and a snippet of vintage wallpaper.
I'm hoping that I'll have these new collages for sale at my re-vamped etsy store...but its proving to be a bit of a challenge to get my old store up and running...but I'll keep you posted when I have the grand re-opening!

2.26.2011

A view from Down Under


My young friend Anna is in Perth, Australia for the next 5 months - she is there with a small group of students from her university.  She started a blog to record her experiences - since she is studying environmental sciences, lots of her impressions are about the flora and fauna of the area as well as other indigenous features...it is fascinating!  I highly recommend that you check it out - I've learned so much about Australia just in the three weeks she has been there.  And its great to get a perspective from much younger eyes - interesting to see what captures her attention...
http://annainperth.blogspot.com

2.23.2011

The Weekly Fluff

There is such an anticipation of spring in the air....


looking for glimpses of green and spring flowers...


But as I drove over to Faded Elegance to fluff my space, there were snowflurries in the air.  It's still February...a little more time to wait...


reflect...


remember...


wish...


and dream about spring days still to come.


For a hit of spring inspiration, visit Faded Elegance in historic downtown Snohomish.

2.21.2011

Beyond auto-focus

I'm not much for new year's resolutions...but I usually make a plan for the year - sometimes detailed (get the studio cleaned up and organized now), sometimes more vague (explore new avenues to showcase my art).  One of the items on this year's plan is to learn how to use my camera to take better pictures.  I was thinking I needed a new camera (and then those funds got diverted into a new computer when the old one was dying) but I think I just need to learn how to more fully utilize (as in "turn off Auto"!) the camera I have.

Stumbled upon the blog Faded Prairie...in additional to lovely images and inspirational ideas, Kristin has a weekly photography challenge.  This week's theme is "Once Loved"...the possibilities for interesting photos just in my house were overwhelming...I went to work...and submitted this photo as my entry.  The gray Pacific Northwest winter makes lighting a challenge...one of many reasons I'm looking forward to spring- better light!


If you want to participate yourself or just see the other fab entries, just click the icon for the link...

2.19.2011

My new love


I'm in love...not with a person or a place...but a process!  Let me explain...

My art friend, Wendy Lee Lynds, is queen of this collage technique that uses gloss acrylic medium for the adhesive in lieu of any type of glue.  She did a fantastic demo of this technique when we collaborated on a booth for the Everett Home & Gift Show in October.  I was fascinated by the technique and have been itching to try it out since then.  We made a plan to get together  - but alas Wendy fell ill...I decided I would give it a shot on my own.

With Wendy's urging, I picked up a copy of Collage - A New Approach by Jonathan Talbot.  Mr. Talbot is the mastermind behind this technique...his book was informative and inspiring.  Watching Wendy's demo helped to solidify the steps of the process...I decided to tweak things a bit since I did not want to buy new art materials (aside from the gloss medium...I had tons of matte medium but its the gloss that does the magic!)

Here is a super-condensed version of what I did...Wendy offers fantastic hands-on workshops and demos on this process...check out her blog for all the info...you really need to learn from the pro!

First-


I gathered an assortment of collage papers/bits/scraps...covered each side with a layer of gloss medium.  Also used the gloss medium to coat a couple of pieces of corrugated cardboard and a mini canvas frame - these would be the foundations to build each collage.  Best to do this step earlier so that everything is dry once you begin.

Next-


I composed my collage and contemplated placement...laid down the first layer of scraps, covered it with the transfer paper and "ironed" it with my quilting iron...since I was working on such small scale (no bigger than 6" square), my quilting iron worked perfectly.  The heat from the iron activates the gloss medium...essentially, the paper is fused to the cardboard.  I purposely extended beyond the edge of the cardboard so I could sand off the excess paper and have a clean edge when completed.


I added a few more elements...it didn't look complete...I remember Wendy mentioning that lightweight elements didn't need to be pre-coated (such as tissue paper or fibers) and could just be added as-is. 

Finally -
A heart formed with vintage package twine was the finishing touch!


Feeling confident, I completed the "Amore King" collage pictured at the top of this post.  I wanted to get a feel how this process would react with different kinds of paper - old book pages, magazine ads, wallpaper scraps...and with old photographs...I have a project in mind for using old vintage photographs - the original print - and wanted to make sure that the surface of the print would not be destroyed by the gloss medium nor the heat of the iron.


Success!  the photo was not harmed by any step of the process.  I can't wait to tackle my next idea...I wonder if gloss medium comes in an economy size... 

2.15.2011

A gift of creativity

A couple of months ago, two events occurred that at first seemed random...but lead to a rather serendipitous outcome...

I was beginning to clean up my studio, starting with removing the clutter from my sewing table...an old apron of my mom's was in the pile...I stopped to look it for a minute...what would I do with it?

A day later I was reading Tiffany Kirchner Dixon's blog, The Fancy Farm Girl...Tiffany, who is a fabulous photographer, was involved in the launch of the newest publication from genius Jo Packham, Where Women Cook.  A Launch Party for the magazine was planned for December in New York City, and a call was issued for aprons to be submitted to festoon the gala event.  There would be two giveaways for those submitting aprons - one winner for the most creative apron and the other winner to be selected at random.  My mom's apron immediately came to mind...my mom taught me to cook and to sew...she was a tremendously creative woman (often because of necessity...what is the quote...necessity is the mother of invention...!) and I credit a lot of my creativity to her.  I packaged up the apron and sent it off.

Lo and behold, I get an email from Jo herself, letting me know how touched she was with my mom's apron...and that I was the random winner!  In a couple of weeks, my prizes arrived...a copy of the hot-off-the-press first issue of Where Women Cook, the current issue of Where Women Create and two books, Where Women Create and Where Women Create Book of Inspiration (both signed by the author - Jo Packham!)


If you want to read about the launch party,  click here for the link to Tiffany's blog posting...you can see my mom's apron gloriously displayed! 

I've been relishing reading the magazines and the books...and feeling inspired...September 2011 will mark the second anniversary of The Creative Connection Event - the brainchild from the duo of Jo Packham and Nancy Soriano, building on the inspiration of Where Women Create and Where Women Cook.  I have it marked on my calendar - planning to be in attendance and hopefully be a vendor!  More details at their site - just click on the logo below...why don't you plan to join me - it would be a great gift of creativity to yourself!
Visit The 2011 Creative Connection Event

an update...after writing this, I determined that this apron really deserved a place of honor...here it is in my office...where it can inspire me everyday!


2.14.2011

Happy Valentine's Day

love this vintage valentine...reminds me of the ones I traded with schoolmates when I was a child...everyone in the class would have their decorated valentine box and by the end of the day, it would be filled with charming images combined with corny puns.

I downloaded this image from a great graphic source - Dover Publications.   You can sign up for weekly FREE graphic images (all of which are copyright free) delivered via email.  Each week usually has a theme - you can review all of the samples and download those that you want - so easy - just click here - Dover Publications

Have a wonderful Valentine's Day...tell your sweetheart you love them...that is the best present!

2.10.2011

Hope


In the midst of winter, I found there was, within me, an invincible summer.
Albert Camus


I know this winter has been brutal in many parts of the country...a sign from my garden that spring is coming...

2.07.2011

Felted...finally

I had a large bag of wool sweaters (some with holes, some with rips, some that just didn't appeal anymore)that was holding space in my studio for the past year...waiting to be felted.  I don't work with yarn - it just has never been my thing... but I love wool & the concept of felting has intrigued me for some time.  The day finally arrived. 

I used these felting directions from FCF Creations.  Frances of FCF Creations is an incredible artist - and I have such envy for artists who work in mediums for which I have no affinity.

Here is my finished pile of felted sweaters.


Now it was time to get to work...I wanted to keep it simple and just emphasize the beauty of the texture.  Here's what I came up with...

Felted Flower Pins


This is a scaled down version of the fabric flower pin that I taught at my Faded Elegance workshop last summer.  Since the felt is so much heavier than cotton or linen fabric, I used just two petal designs instead of three.  You can find a template for making these fabric flowers at the end of this post.

a vintage button & tulle
add embellishment


vintage millinery gives a
special touch


Felted pillow


The bottom half of one of the sweaters was perfect size for a 12" x 16" down pillow form.  I sewed a seam at the bottom of the ribbing, tacked up the sides and then cut out a flap to fold over.  I whip stitched the edges of the flap with silk ribbon to give it a finished look.  I cut a slit for the buttonhole (with felting there is no raveling so didn't need to bind the hole) and added a vintage button for closure.


Felted vases


I saw this idea of wrapping simple glass vases with wool cuffs in Country Home magazine years ago.  The sweater sleeves were ideal  - on the two above, I added a circle of small white buttons to set off the edge.  On the three below, gray metal buttons, one large mother of pearl button and more silk ribbon played up the gray tones.


I have some sweater pieces left over...a small zippered pouch?  cozy valentines?  hand warmers?  A benefit of this sweater felting...one of the sweater vests from my partner was huge and twisted out of shape...after felting, it fit me just fine - and is plenty warm as well!
Be creative with the pattern below - I would love to see what you make!
click on pattern and then zoom in.
this will give you a full size paper
for printing.

2.04.2011

A little green with the gray

Last Friday I joined up with my friend Sue and her daughter Anna for a dual birthday celebration (plus bon voyage for Anna who just left for 5 months in Perth Australia - I'm so envious and excited for her!) 

After lunch we walked over to Bountiful Home, a charming home and garden boutique located in the heart of Edmonds.


The shop is a quaint mix of old world style meets fresh country - during the warmer months, there's a petite nursery in the backyard. 
Once inside we met both Todd Waddell, the owner and Jenifer Matson, one of my favorite customers from the salvage studio who just happened to be stopping by for a little spring inspiration herself...and we were not disappointed...


Jenifer showed me these intricate fabric cuffs she is making...I love the color combinations and the textures of the fabric/ribbon/buttons.  She hinted that she may be opening up an etsy shop to sell these...I'll keep you posted if she does...


A nature theme pervades the store...one of my favorite inspirational standards...in fact, the nature collages displayed on the wall are my work - a pairing of either a fern, a feather or a leaf with an original page from a turn of the century vintage book.
If you're in the neighborhood, you must stop in -
122 Fourth Ave S
Edmonds, WA
425 . 775 . 3800

2.02.2011

Metal madness returns!

It all started with this collection of keys and ball chain that I picked up at an estate sale last summer...the gears began turning...


I'm not much of a jewelry person - the only jewelry I wear constantly is a pair of sterling hoop earrings I purchased on Portabella Road in London 12 years ago - but the occasional funky/vintage pin is not uncommon.  Something about this metal spoke "necklaces" to me.

As is the case, this idea ruminated for a while...and in the meantime, I unearthed quite a collection of metal fishing lures...now here was some well-loved metal...all sorts of shapes, sizes and colors - with very interesting connectors - aka - spinners.

With my new worktable in place, it was easy to gather all the interesting pieces together - old keys, fishing lures, spinners, metal clock hands, ball chain, discarded costume jewels...
I picked up these embossed washers - thought they would be a perfect accent...
I got out some wire and my needle-nose pliers and went to work...

The end results...
Now these aren't any great jewels...just a fun/funky piece to wear...I love the different textures and finishes.  Believe me, My Brown Wren (a favorite jewelry artist!) you have nothing to fear from me treading on your territory!                 
I had a couple of stray silver chains; I paired up the more delicate chain with the clock hands.
You'll be able to find these charming adornments at my space at Faded Elegance...now back to creating...what else I can find around here to throw into the mix...

worth a look...

Related Posts with Thumbnails